Over 2400 5-Star Reviews
Get A Free Quote!
Call (832) 303-3546

Tips for Maintaining Your Dryer Vent Between Cleanings

TL;DR: Clothes dryers are essential but require regular maintenance, especially cleaning the dryer vent to prevent hazards like fires from lint buildup. Tips include cleaning the lint trap after each use, inspecting the vent hose for damage, installing a dryer vent alarm for safety alerts, using a shorter vent hose to reduce lint accumulation, employing a dryer vent brush for deeper cleaning, and scheduling annual professional inspections. These steps ensure your dryer runs efficiently, reduces risks, and extends its lifespan. For expert dryer vent cleaning in Katy, TX, contact UpFront Home Services for reliable and safe maintenance.

Clothes dryers are an irreplaceable appliance in most American homes. They make it easy to have warm, perfectly dry clothes, even in winter. It’s estimated that over 80% of Americans have a dryer in their home. These machines, though handy, require regular maintenance to keep functioning efficiently.

Responsible homeowners know that keeping their clothes dryers in working order involves regularly cleaning the dryer vent. A clogged vent can cause the entire dryer to malfunction and, more concerning, turn it into a fire hazard.

However, having the vent professionally cleaned every week is not practical, so homeowners must take care of the dryer vents themselves until the next scheduled cleaning session. That’s why we’ll give you a few useful tips for maintaining your dryer vent between cleanings. If you want to keep your dryer running smoothly and safely, give them a try.

Why Dryer Vents Need Regular Maintenance

Clogged or dirty dryer vents can cause your dryer to work extra hard and give you worse results. More importantly, if your dryer vents have lint all over them, you could be at risk of a household fire. Lint catches fire easily, and the temperature rise from a clogged vent can easily ignite it. According to the NFPA, clothes dryers cause around 15,970 house fires annually in the US.

The leading cause is dirty or clogged dryer vents. Besides the fire risk, blocked vents can also lead to moisture problems. When the dryer cannot vent properly, it leads to moisture in your home. That will not only impact the quality of the air but also cause health issues. Regularly cleaning your dryer vents keeps your appliance running efficiently and helps protect your home and family from these potential dangers.

Tips for Maintaining Your Dryer Vent

Let’s see how you can effectively maintain your dryer vent between professional cleanups: 

Clean the Lint Trap Each Time

Lint buildup reduces airflow through the vent, causing your dryer to overexert and use more electricity. This wears down the machine, increasing the risk of malfunctions. To clean the lint trap, you must:

  • Locate it on top of the dryer or inside the clothes dryer door.
  • Pull out the lint screen.
  • Gently remove the lint with your finger or a soft brush.
  • Put all the lint in a trash can.

Rinse the screen with warm water and mild soap for a deeper clean, then let it dry completely before reinserting.

Inspect the Vent Hose Regularly

Check whether your vent has visible signs of wear and damage. Cracks, kinks, and blockages are typical problems you might encounter often. Damage to your dryer vent can cause trouble. Cracks allow lint to escape, creating a fire risk.

Kinks restrict airflow, extending drying times and potentially leading to overheating. Blockages, often caused by lint buildup, can also hinder airflow and increase the risk of fire. To inspect the vent hose safely, follow these instructions:

  • Unplug the dryer.
  • Illuminate the area to see the hose and its connections clearly.
  • Detach the hose first from the dryer and then from the wall vent.
  • Look inside both ends of the hose for any obstructions or damage.
  • Use your vacuum to try and remove as much of the lint as possible.

A vent cleaning brush can help reach inside the hose for deeper cleaning. Be safe while cleaning. Use a mask and gloves to protect your airways and ensure you don’t cut yourself on the sharp edges.

Install a Dryer Vent Alarm

A dryer vent alarm is a device that monitors the airflow in your dryer vent. When lint buildup or other obstructions hinder proper airflow, the alarm sounds, alerting you to take action. Installing a dryer vent alarm improves safety by providing immediate feedback on the vent’s condition, allowing you to address problems before they escalate. To set up a dryer vent alarm, start by:

  • Purchasing a reliable model designed for your dryer.
  • Read the manufacturer’s installation instructions.
  • Mount the sensor near the vent outlet. 
  • Connect it to the dryer’s power supply.
  • Securely attach the alarm. 
  • Try it out to see if it works. 

Every now and then, check whether the sensor has any dust or lint accumulation that could impede its work. Clean it regularly, and to avoid malfunctions, replace the batteries as recommended.

Install a Shorter Vent Hose

A shorter hose reduces the distance air travels, which minimizes the chances of lint buildup. A shorter vent hose also simplifies the cleaning process, making it easier to reach and remove any lint that does accumulate.

When selecting a shorter vent hose, measure the distance from your dryer to the exterior vent. Choose a hose that fits this length without excessive slack. Flexible metal hoses are generally recommended over plastic or foil hoses due to their durability and fire resistance.

Once you have the correct length, disconnect your current hose, but not before turning off and unplugging the dryer. Attach the new, shorter hose securely to the dryer and the exterior vent, using clamps to hold it in place. Remove any kinks or sharp bends from the hose, as these can impede airflow. A shorter vent hose improves the dryer’s efficiency and safety, reducing the need for frequent cleaning and lowering the risk of potential hazards.

Use a Dryer Vent Brush

A dryer vent brush is an effective tool for maintaining the cleanliness of your dryer vent between professional cleanings. This brush helps remove lint and debris from the vent. The brush’s flexible, long bristles can easily navigate the vent’s twists and turns, helping you reach further and remove trapped lint.

Cleaning your dryer vent with a brush is simple. Insert the brush into the vent opening. Then, gently rotate it as you slowly push it further in. This dislodges lint and other debris, which you can manually vacuum or collect. Regular brushing maintains the vent’s optimal airflow, improving the dryer’s efficiency.

You should use a dryer vent brush at least once every three months or more frequently if your clothes take longer to dry than usual. Regular brushing helps keep your dryer operating efficiently and safely, minimizing the risk of lint buildup that could lead to overheating or a fire.

Schedule Regular Professional Inspections

Scheduling regular professional inspections for your dryer vent is a wise practice. Professionals thoroughly clean dryer vents because they understand the specific hazards. They remove every last bit of lint and check for potential issues with the dryer’s functionality.

You should have your vents professionally cleaned at least once a year, but you can make that more frequent if you use your dryer heavily. If you are looking for a good dryer vent cleaning service, ensure you check the certifications and reviews. It is also beneficial to choose a service that adheres to the guidelines set by the National Air Duct Cleaners Association. 

Keep Your Dryer in The Best Shape With Professional Vent Cleaning

The dryer vent may seem like a small part of your clothes dryer, but it performs a crucial function. A clogged vent leaves you with damp clothes and increases your electricity bill. The gathered lint can lead to a fire, and who wants to live with that risk?

To keep your dryer vent and clothes dryer in top condition, turn to UpFront Home Services for professional help. We are committed to customer satisfaction and provide top-tier dryer vent cleaning services in Katy, Texas. Our attention to detail, on-time service, and adherence to CDC best practices mean you get the best value. 

Keep your home safe and efficient – call us today for a free estimate!

Are You Allergic To Your Home?

6 Things That You Need To Be Cleaning

Do you find yourself coughing, sneezing, or with watery eyes indoors? Is it like the only time you get relief is when you go outside?

Everyday living and pets can cause poor indoor air quality problems like dust, mold, and dander which agitate your allergies. If you find yourself sneezing all the time, here are some things that need to be on your cleaning checklist to improve the air quality in your home.

1) Air Duct Cleaning

For a healthier home we always recommend having your Air Ducts cleaned on an annual basis. This helps keep the dead skin cells, dust mites, and other contaminants from continuing to circulate throughout your home. We have also found that keeping your Air Ducts cleaned keeps your carpets cleaner longer and avoids those nasty air filtration soiling marks that could ruin your carpet. Not only will cleaning your air ducts reduce the allergens in the air, it will also extend the life of your A/C System, as a reported 90% of system failure is due to dust. 

2) Carpet Cleaning

Having your carpet professionally steam cleaned at a minimum of 2 times per year dramatically reduces the allergens in your home. The steam is a dust mite killer and the power of a truck mounted steam cleaner will remove the soiling that your vacuum misses. The carpet in your home is the largest filter you have protecting you from allergens entering the air, I recommend cleaning your carpet every 3 months to ensure the filter is always clean. In between cleanings we recommend you vacuum 1-2 times per week with an asthma and allergy certified vacuum. Other vacuums tend to exhaust dust back into the air vs remove it, having a quality vacuum in your home is crucial. 

3) Tile and Grout Cleaning

Harmful bacteria can live and thrive on tile and grout. Having your tile and grout cleaned not only sanitizes the surface but also eliminates the residues from your floors that lead to poor indoor air quality. A huge benefit to professional tile and grout cleaning is how 1 clean can make your home not only look cleaner and brighter but actually be cleaner and brighter.


4) Upholstery Cleaning

Dust, Dander, and other contaminates like old food spills or vomit tend to land right where we sit and watch tv. Cleaning your upholstery on a regular basis helps to limit the amount of dust and other contaminates in the air but also in one of the places we regularly lounge in. Vacuuming your draperies will also help reduce the amount of dust that floats through the room.


5) Area Rug Cleaning

Rugs are amazing at hiding dirt. If you have ever seen a rug beaten or dusted you would see all the dust just floating in the air. Having your rugs professionally cleaned helps remove the dust and dry soiling that vacuuming alone just doesn’t get. Area rugs are very much like your carpet in that they are filters for your homes indoor air quality. They can get clogged up with dry soiling and dust mites however and should be cleaned once a year.


6) Mattress Cleaning

Did you know mattresses weigh more after years of use than when you buy them brand new? The reason why is because dead skin cells and dust mites collect on the surfaces of mattresses overtime causing the weight of the mattress to increase. In fact a mattress will double its weight on average in a period of 10 years. To maintain the health of your mattress we recommend annually steam cleaning and using allergy approved mattress protectors on your mattress. 

Defeat Allergens Once And For All

By cleaning the above 6 things you are going to be dramatically improving your indoor air quality and providing your family a healthy home to enjoy. We want to be your partner in cleaning by creating a unique plan that will provide your home with consistent maintenance.

Want to schedule a Healthy Home Assessment to see exactly what unique needs your home has? Send us a text to (832)913-6579 and request a Free Healthy Home Assessment today!

Already ready for service? Call us at (832)303-3546 to schedule.

7 Cleaning Hacks For A Healthier Home

Cleaning has a way of forming new beginnings. We like to think about cleaning in the spring but its never not a perfect time to clean out the dust and dirt and start fresh. A thorough cleaning can do wonders for your home, your health, and your mental well being.

When you clean your home, you’re not just cleaning dirt and dust. You’re also removing allergens, bacteria, and other pollutants that can make you and your family sick. A clean home is a healthier home, and a healthier home is a happier home.

Don’t wait, get back to cleaning today! Here are 7 Cleaning Hacks For A Healthier Home:

Appliance Cleaning

Give Your Stainless Steel Appliances The Shine They Deserve and Remove Harmful Bacteria with Sheila Shine.

Stainless steel surfaces can harbor harmful bacteria, such as E. coli and Salmonella. Regular cleaning of your appliances can help remove these germs and prevent the spread of disease.

Hack Tip #1: Baby Oil works and will definitely give your appliances a nice shine and leave them smudge resistant.

Tile Floor Cleaning

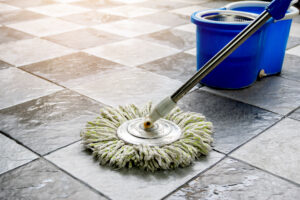
Throw Out Your String Mop and Upgrade To An O-Cedar Mop.

Tile floors can accumulate dust, dirt, and other allergens that can trigger allergies and asthma. Regular cleaning can help remove these allergens and create a healthier indoor environment.

Hack Tip #2: Flat Head Spray Mops Work Well Too But You Have To Change The Pads Often During The Cleaning.

Baseboard Cleaning

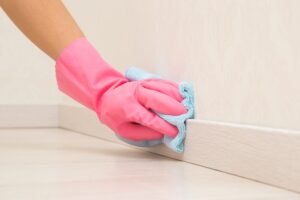
Clean Up Your Baseboards With Ease Using Krud Kutter.

Baseboards can accumulate dust, dirt, and other allergens that can trigger allergies and asthma. Regular cleaning can help remove these allergens and create a healthier indoor environment.

Hack Tip #3: Magic Erasers and Water Can Do Wonders On Baseboards But The Krud Kutter Speeds Up The Cleaning Process.

House Washing

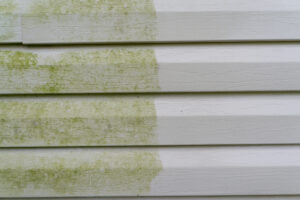
Take The Mildew Off Your House With A Pump Up Sprayer, Outdoor Bleach, and A Spray Hose.

Dirt and grime can damage the exterior surfaces of your home over time, leading to costly repairs. Regular house washing can help maintain the integrity of your home and prevent the need for expensive repairs.

Hack Tip #4: A Soap Sprayer On A Garden Hose To Apply The Bleach.

Cleaning Chemicals For Tile Floors and Natural Stone Countertops

Switch Out Your Old Mopping Fluid For Crystal Clean by Stone Pro. This product not only leaves your tile floors cleaner but also put a layer of sealant in the grout after each use.

Using the right cleaning chemicals for your floors and counters is essential for maintaining a healthy home environment. When cleaning, it’s important to choose chemicals that are safe for your particular surface and avoid products that may leave a residue or film.

Hack Tip #5: Zep Neutral Floor Cleaner works for the cleaning too and is a bit cheaper if you are on a budget.

Shower Glass Cleaning

Get the hard water stains off your glass. Use Bioclean to help lift the hard water residue off the glass.

Hard water can contribute to the buildup of mineral deposits, which can create an unsightly and difficult-to-clean film on your shower glass. This can make it harder to remove soap scum and other debris, which can harbor harmful germs and bacteria if left unchecked. Over time, this buildup can also lead to scratches and other damage to your shower glass, which can create areas where bacteria and germs can thrive. In addition, hard water can cause skin irritation and dryness, which can lead to uncomfortable itching and flaking. Keeping your shower glass clean and clear of these stains can lead to a healthier home and extend the life of your shower.

Hack Tip #6: A Magic Eraser can sometimes remove the hard water spots from the shower glass without any chemical aid.

Deep Cleaning Your Shower

If you have ceramic tile or porcelain tile in your shower, a little CLR can go a long way to remove soap scum and hard water stains.

Deep cleaning in the shower can contribute to a healthier home environment by removing buildup, preventing the growth of harmful germs and bacteria, improving indoor air quality, enhancing the appearance of your bathroom, and preventing accidents.

Hack Tip #7: Use White Vinegar to dissolve the minerals built up into the shower head. The trick is to use a plastic bag and a rubber band to secure the vinegar around the shower head.

BONUS HACK:

Call UpFront Home Services to jump start your Spring Cleaning into Hyper Drive with SpaceX Rocket Boosters! We can clean your carpet, tile, upholstery, ducts, dryer vent, wood, rugs, and so much more! Give us a call at (832)303-3546 to schedule your cleaning today.

How To Clean Dryer Vent Katy TX

Dirty dryer vents are not just disgusting; they are also a significant fire hazard. Statistics indicate that lint-filled, dusty dryer ducts are on the top of the list when it comes to causes of house fires. While grimy dryer ducting may not always do damage to your home immediately, it wastes your energy, time and money.  If a dryer is connected to ducting and vents filled and covered with debris and lint that will affect its functioning.

If your dryer cleaned wet loads in a single cycle or even less but needs two to three cycles now, it’s time to check the vent. It’s likely the dryer isn’t at fault and that the clogs in the vents and ducting are the culprits. The best way to make sure this doesn’t occur is to hire vent cleaners for regular cleaning of these features. However, it’s also a good idea to clean the duct and vent regularly. These are the steps you need to follow in cleaning a dryer vent:

Here’s How To Clean Dryer Vent Katy TX

Step 1: Locate The Vent

To clean the dryer’s vent system correctly, you first need to know where it is starts and ends. Dryer units have a 4″ exhaust at the back. This pipe connects to duct work that runs through the wall via an elbow or pipe. The hot air from the dryer moves through the metal pipe system and emerges through a larger opening on an exterior wall of your home. The exit point may also have a lowered cover that allows the warm air to move out unhindered while keeping shut otherwise to keep pests out.

Step 2: Disconnect Your Dryer Safely

Once you have located the duct’s starting and ending points, disconnect your dryer. If you have an electric dryer, it’s an easy task. You only have to unplug the power cord of the appliance, from the electrical outlet in the wall. The next step is to remove clamps and metal tape that have been used to connect the vent pipe to the exhaust.

You also have the option to remove any material that connects the vent to the ducting, if that’s easier. Pull the vent pipe gently and remove it from the point where it connects to the wall duct. In the case of electric dryers, you can quickly push the appliance, and this will give you more room to work.

If your dryer runs on natural gas, you’d have to be more careful. Ensure that you don’t move the gas line excessively while re-positioning the unit. Just like a gas range, the system’s fuel hookup usually is made of a flexible hose, and you need to handle it carefully. A gas leak can be hazardous and have severe consequences. If you are not sure about how to handle this task, stop and call in a professional for cleaning the dryer vent.

Step 3: Clean As Well As You Can

Now you will have easy access to the opening of the dryer duct in the wall of your laundry room. You can remove the duct cover/flap and get to the exit point on the exterior wall of your house as well. You would need a special cleaning kit for the dryer vent.

It’s readily available at any Home Depot or even your local hardware store and costs under $20.It has a few flexible segments and a lint brush. When you connect these components as mentioned, you get a rod that extends to 12″. The end of this contraption can also be attached to a standard power drill if you want.

It enables you to spin the brush with high power and speed, which helps in a better clean. You can also clean the duct from the outside-in if you want; that makes it easy to collect all the lint once it falls to the laundry floor. You’d have to try a few times to get through the other end if there are many bends in the duct work.

Step 4: Clean Up Everything and Reconnect The Duct And Other Parts

Clear up all the lint with a broom and dustpan. Once you have tidied up everything, set the appliance back in the position. However, if you have a soft foil-style vent part that links to the duct in the wall, its best to get rid of it, as it is a fire risk. Replace it with a semi-rigid vent and 90-degree aluminum elbows. They provide the best airflow, are durable and hard, yet adjustable.

Step 5: Give Your Dryer A Trial Run 

It can be time-consuming, messy, and sweaty to get this job done right. But keep in mind that neglecting dryer vent and duct cleaning will only affect the functioning and lifespan of your dryer. Once you have cleaned the vent and everything is back in position, do a test run of your dryer. You will surely find that the appliance has regained its power.

Clean your vent every few months or more frequently, depending on how often you use the appliance. This will go a long way in keeping the dryer functioning as it should. You will also have successfully reduced the risk of fire, and it will also help you save on your energy bills.

Hire Dryer Vent Cleaning Professionals

If you feel that cleaning dryer vents and ducting isn’t something you want to or can do, make it a point to call in professionals for the job. They have the experience, skills, and equipment required to handle this job efficiently. It’s best to engage local technicians that would be able to provide these services when you need them.

As a Veteran-founded company, we at Upfront Home Services offer honest and affordable dryer vent cleaning services. You will find that these services are incredibly affordable, so you don’t have to think twice while hiring us. For any more information, feel free to contact us at (832) 303-3546. You can also send us an email via this Contact Us form, and one of our team members will call you shortly.