How To Clean Dryer Vent Katy TX
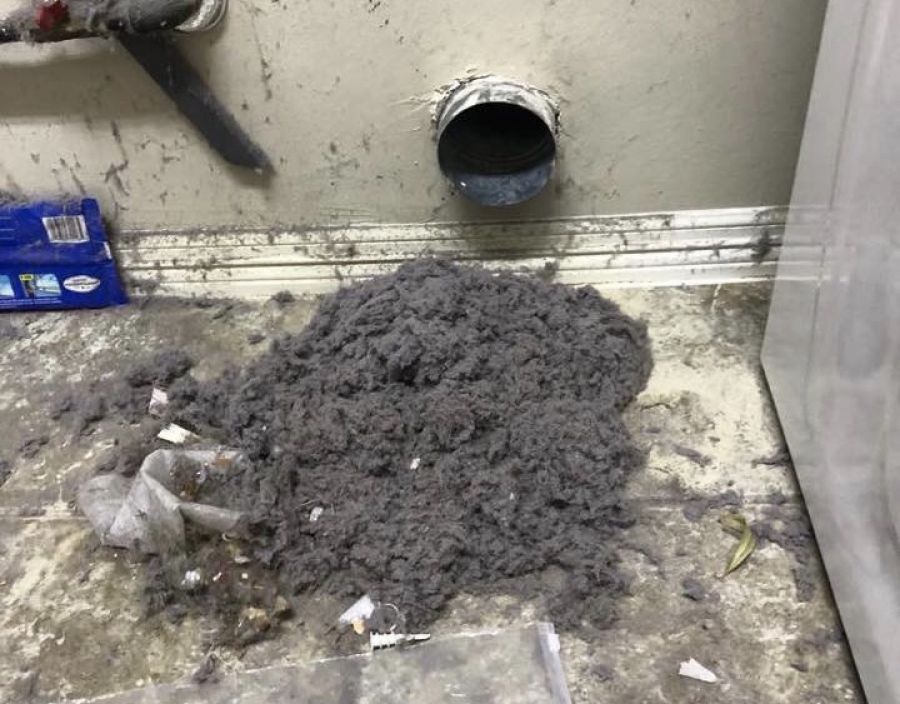
Dirty dryer vents are not just disgusting; they are also a significant fire hazard. Statistics indicate that lint-filled, dusty dryer ducts are on the top of the list when it comes to causes of house fires. While grimy dryer ducting may not always do damage to your home immediately, it wastes your energy, time and money. If a dryer is connected to ducting and vents filled and covered with debris and lint that will affect its functioning.
If your dryer cleaned wet loads in a single cycle or even less but needs two to three cycles now, it’s time to check the vent. It’s likely the dryer isn’t at fault and that the clogs in the vents and ducting are the culprits. The best way to make sure this doesn’t occur is to hire vent cleaners for regular cleaning of these features. However, it’s also a good idea to clean the duct and vent regularly. These are the steps you need to follow in cleaning a dryer vent:
Here’s How To Clean Dryer Vent Katy TX
Step 1: Locate The Vent
To clean the dryer’s vent system correctly, you first need to know where it is starts and ends. Dryer units have a 4″ exhaust at the back. This pipe connects to duct work that runs through the wall via an elbow or pipe. The hot air from the dryer moves through the metal pipe system and emerges through a larger opening on an exterior wall of your home. The exit point may also have a lowered cover that allows the warm air to move out unhindered while keeping shut otherwise to keep pests out.
Step 2: Disconnect Your Dryer Safely
Once you have located the duct’s starting and ending points, disconnect your dryer. If you have an electric dryer, it’s an easy task. You only have to unplug the power cord of the appliance, from the electrical outlet in the wall. The next step is to remove clamps and metal tape that have been used to connect the vent pipe to the exhaust.
You also have the option to remove any material that connects the vent to the ducting, if that’s easier. Pull the vent pipe gently and remove it from the point where it connects to the wall duct. In the case of electric dryers, you can quickly push the appliance, and this will give you more room to work.
If your dryer runs on natural gas, you’d have to be more careful. Ensure that you don’t move the gas line excessively while re-positioning the unit. Just like a gas range, the system’s fuel hookup usually is made of a flexible hose, and you need to handle it carefully. A gas leak can be hazardous and have severe consequences. If you are not sure about how to handle this task, stop and call in a professional for cleaning the dryer vent.
Step 3: Clean As Well As You Can
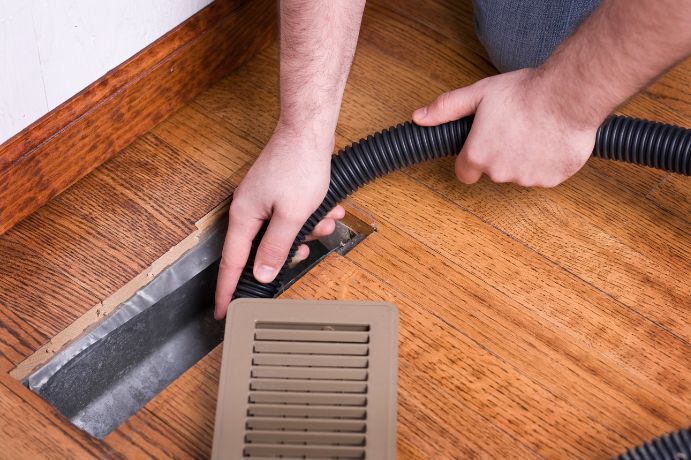
Now you will have easy access to the opening of the dryer duct in the wall of your laundry room. You can remove the duct cover/flap and get to the exit point on the exterior wall of your house as well. You would need a special cleaning kit for the dryer vent.
It’s readily available at any Home Depot or even your local hardware store and costs under $20.It has a few flexible segments and a lint brush. When you connect these components as mentioned, you get a rod that extends to 12″. The end of this contraption can also be attached to a standard power drill if you want.
It enables you to spin the brush with high power and speed, which helps in a better clean. You can also clean the duct from the outside-in if you want; that makes it easy to collect all the lint once it falls to the laundry floor. You’d have to try a few times to get through the other end if there are many bends in the duct work.
Step 4: Clean Up Everything and Reconnect The Duct And Other Parts
Clear up all the lint with a broom and dustpan. Once you have tidied up everything, set the appliance back in the position. However, if you have a soft foil-style vent part that links to the duct in the wall, its best to get rid of it, as it is a fire risk. Replace it with a semi-rigid vent and 90-degree aluminum elbows. They provide the best airflow, are durable and hard, yet adjustable.
Step 5: Give Your Dryer A Trial Run
It can be time-consuming, messy, and sweaty to get this job done right. But keep in mind that neglecting dryer vent and duct cleaning will only affect the functioning and lifespan of your dryer. Once you have cleaned the vent and everything is back in position, do a test run of your dryer. You will surely find that the appliance has regained its power.
Clean your vent every few months or more frequently, depending on how often you use the appliance. This will go a long way in keeping the dryer functioning as it should. You will also have successfully reduced the risk of fire, and it will also help you save on your energy bills.
Hire Dryer Vent Cleaning Professionals
If you feel that cleaning dryer vents and ducting isn’t something you want to or can do, make it a point to call in professionals for the job. They have the experience, skills, and equipment required to handle this job efficiently. It’s best to engage local technicians that would be able to provide these services when you need them.
As a Veteran-founded company, we at Upfront Home Services offer honest and affordable dryer vent cleaning services. You will find that these services are incredibly affordable, so you don’t have to think twice while hiring us. For any more information, feel free to contact us at (832) 303-3546. You can also send us an email via this Contact Us form, and one of our team members will call you shortly.

Other Blogs You May Be Interested In


Categories
Leave a Reply